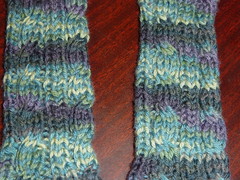
I named the Rose because well I made these last March for my Aunt Rose. So I named the pattern after her.
Rose Fingerless Mitts
Wosted weight yarn (I used around 125 yards)
size 7 needles in which ever style of knitting around that you perfer (dpns, magic loop or 2 circs)
markers (I used 3)
cable needle (if you use one)
waste yarn
Note: I have made these mitts 3 times and each time I cabled different. Cable how you like. For example: On my first pair I all of the cables twisted in one direction. On the 2nd pair the cables on the left mitt went right and the cables on the right mitt went left. On the 3rd pair the cables on each mitt twist toward each other. Feel free to do any of these ways. The pattern is written for the twisting toward each other.
Here is an example of the cables that are written

(more examples at the end)
Both mitts start the same and only differ in where the thumb gusset is placed
cf4 - place the next 2 stitches on cable needle and hold in front. Knit the next 2 stitches then the 2 stitches from cable needle
cb4 - place the next 2 stitches on cable needle and hold in back. Knit the next 2 stitches then the 2 stitches from cable needle
m1 - use whichever form of increase you are comfy with. I use the backward loop
CO 36
Place marker and join (making sure nothing is twisted)
R1: k2, p2, k4, p2, k2, p2, k4, p2 then k2, p2 to end of round
R2: repeat rd 1
R3: k2, p2, cf4, p2 k2, p2, cb4, p2 then k2, p2 to end of round
R4-8: repeat rd 1
R9: repeat rd 3
Basically you do the cable round every 6th round
R10 - 14: rpeat rd 1
R15: repeat rd 3
R16 - 20: repeat rd 1
R21: repeat rd 3
R22 - 26: repeat rd 1
R27: repeat rd 3
R28 - 32: repeat rd 1
R33 is the round where the thumb gusset is started. I use what is for me a basic one. For the left mitt the gusset will start in the first k2 of the round. For the right mitt the thumb gusset will start in the first k2 after the second cable.
R33: repeat rd 3 and at the same time at the k2 for the appropiate mitt: k1, place marker, m1, place marker, k1
thumb gusset: basically every other round you increase like this
k1, slip marker, m1, knit to marker, m1, slip marker, k1
Next round knit across the gusset stitches
Increase until you have 15 stitches between markers. Knit across then place stitches on waste yarn and continue mitt untill end
Remember to continue thumb gusset and
R34 - 38: round 1
R39: round 3
R40-44: round 1
R45: round 3
R46 - 50: round 1
R51: round 3
R52-56: round 1
R57: round 3
R58 and 59: round 1
BO
Place thumb stitches on needles and also pick up 2 stitch where thumb meets glove.
next round: k2tog then knit to last 2 stiches, k2tog
Knit 2 more rounds then BO
Weave in ends then make other mitt and Enjoy!!
Copyright: Qutecowgirl. Blah Blah my pattern enjoy for personal use, do not call your own or sell. Feel free to link
Any questions email @ mrstank1 (AT) optonline (DOT) net

as written

These mitts have the cables on the left mitt going right and the cables on the right mitt going left. It is a little hard to see with the colors

close up
I do not have a picture of the first pair. Totally forgot to take a picture before I shipped them off.
Enjoy!!
=)
4 comments:
NOOOO! Did not see fun new pattern...must continue working on the 30 WIPs I already have....mustn't look....!
:)
They are very cute....
Oooh very pretty - great job on the pattern! =)
hey, just wanted to say thank you for sharing your lovely pattern. First cables I have tried and didnt turn out too bad! Will certainly keep an eye out for anymmore you share. :-)
Just finished the right mitt...awesome pattern! Thanks for posting it!
Post a Comment